Fun Buckle Card
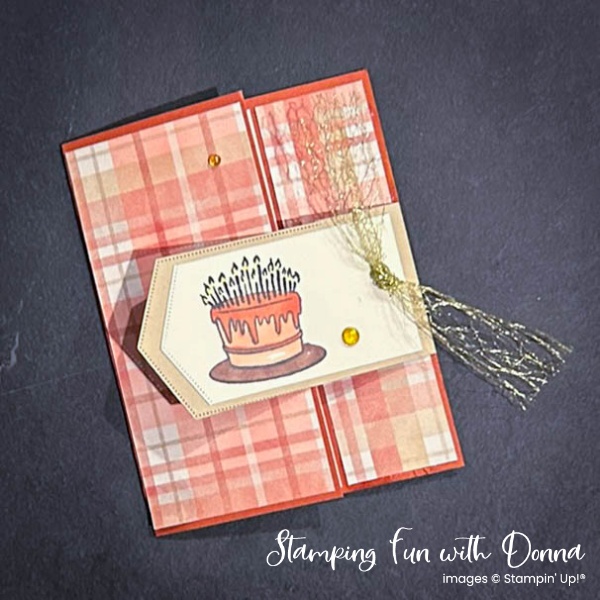
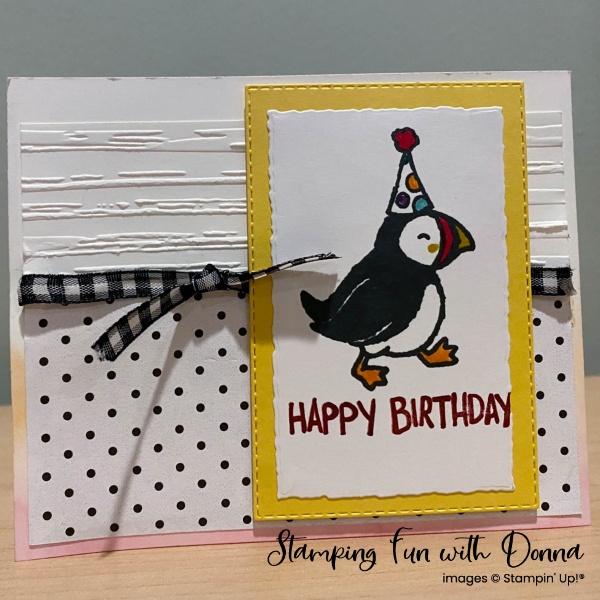
What a fun buckle card! This paper is so gorgeous and makes great masculine and feminine cards. We can all use more ideas for masculine cards, am I right? The buckle flaps over the card with a cute birthday cake from One More Year.
I am heading to Stampin’ Up!’s On Stage (its yearly convention) for the first time ever and I’m so excited! This year’s convention is in Raleigh, which is within (long) driving distance for me, so I could not pass up the opportunity to meet in real life and party with friends I have made over the years on the internet.
One of the things Stampin’ Up! demonstrators are famous for is swaps. We love to create cards and exchange with other demonstrators to get new ideas from each other. This is my swap for On Stage! and I couldn’t be more thrilled with how it turned out.
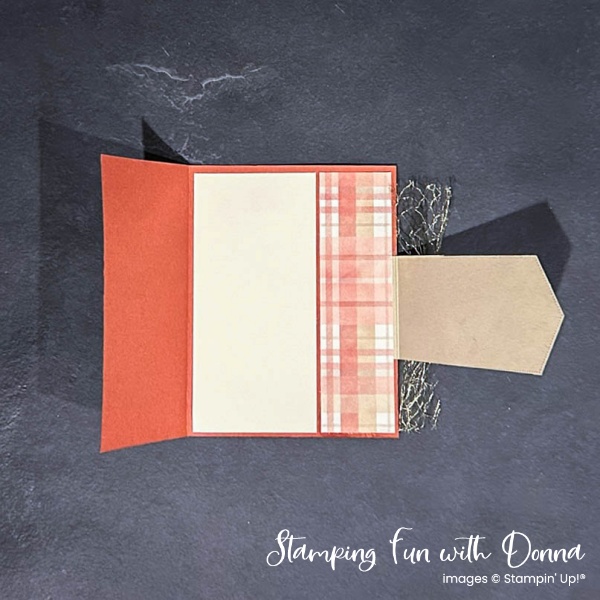
To make this card, create a regular sized card, then lop off 1 3/4″ from the front. Cut one piece of Timeless Plaid designer series paper at 5 1/4″ long, then cut into strips that are 2 1/4″ and 1 1/2″. These pieces are adhered to the card front. The larger piece goes on the left and the smaller piece on the right – and will actually be adhered to the “inside” of the card even though you see it from the front. Cut a piece of Basic Beige the same size as the first designer series paper piece to go inside for your note. It will be completely hidden when the card is closed.

To create the buckle, use the tag die from Birthday Celebrations. It needs to be longer than the die, so use the partial die cutting technique to extend the die. Basically, place the top plate only over the tip and that’s the only part that cuts. Then you can make it as long as you wish. I did this technique in Crumb Cake. I made a second tag in Basic Beige, and simply cut the Basic Beige piece to be thinner. Fold the end of the Crumb Cake and adhere it under the designer series paper to hide the end.
Have you checked out the adorable stamps in One More Year yet? I am loving these cute and sassy stamps. And if I have a chance to color it with Stampin’ Blends? – yes please! I finished it off with Gold Open Weave trim and Gold Textured Adhesive Backed dots.
If you would like more information on partial die cutting, this fantastic technique is covered in my Tutorial from March 8, 2025. Check out my Tutorials for sale on this and many other amazing techniques!
If you make the card please drop me a line, tag me, or send me a pic!